“手上过”是方言,跟那句“Talk is cheap. Show me the code.”的意思差不多。
本文尝试着用Spring Boot 3.0搭建了一个基本的单体应用,Spring Security结合Json Web Token进行用户认证和授权,Caffeine缓存结合OncePerRequestFilter过滤器来记录访问日志,另外统一了Controller的返回和全局异常处理,并给出了一些扩展点的思路。
希望在后续的学习中可以用这个项目来做验证和测试,也可以作为一些简单项目的脚手架,稍微扩展一下就可以把重点放在业务实现上。
已开源: GitHub-Practice Spring Boot 3.0-Single Spring Boot 3.0 手上过 - GraalVM原生镜像
从配置下手 笔者个人的经验,要搞清楚一个Spring Boot项目,最好的方式就是从配置下手去了解项目的整体架构。
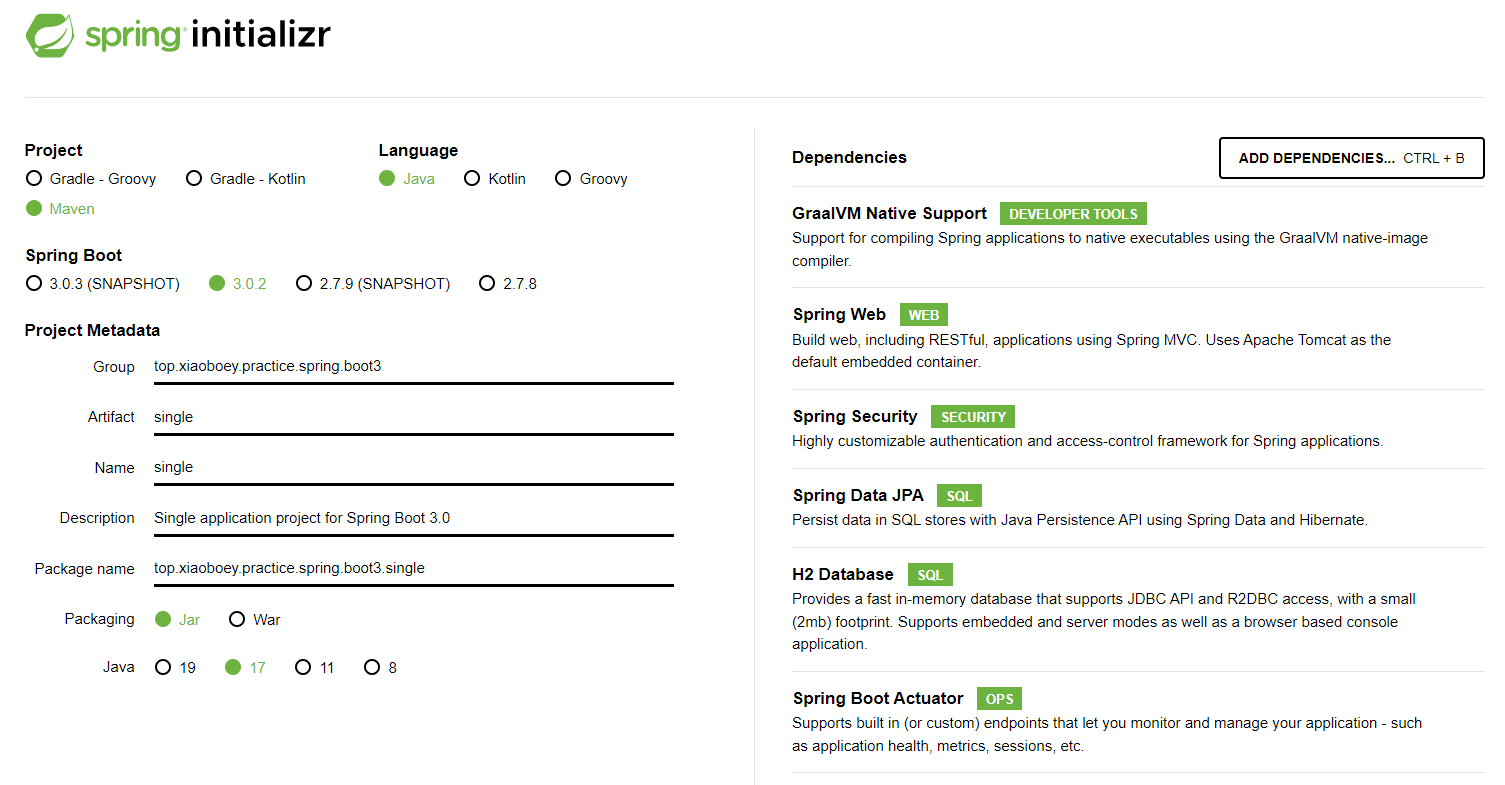
pom.xml Maven项目的依赖配置在pom.xml文件,在 start.spring.io 上初始化时,选择的Spring Boot版本和依赖如下:
后来增加了Caffeine缓存和JWT(Json Web Token)的依赖:
pom.xml 1 2 3 4 5 6 7 8 9 10 11 12 13 14 <dependency > <groupId > org.springframework.boot</groupId > <artifactId > spring-boot-starter-cache</artifactId > </dependency > <dependency > <groupId > com.github.ben-manes.caffeine</groupId > <artifactId > caffeine</artifactId > </dependency > <dependency > <groupId > com.auth0</groupId > <artifactId > java-jwt</artifactId > <version > 4.3.0</version > </dependency >
在pom.xml里把Initializr添加的hibernate-enhance-maven-plugin给注释掉了,解决下述异常:
1
2
3
4
5
6
[ERROR] Failed to execute goal org.hibernate.orm.tooling:hibernate-enhance-maven-plugin:6.1.6.Final:enhance (enhance) on project single: Unable to enhance class: SimpleUser.class: Failed to enhance class top.xiaoboey.practice.spring .boot3.single.entity.SimpleUser: A wildcard does not represent an erasable type: ? extends org.springframework.security.core.GrantedAuthority -> [Help 1] [ERROR] [ERROR] To see the full stack trace of the errors, re-run Maven with the -e switch. [ERROR] Re-run Maven using the -X switch to enable full debug logging. [ERROR]
这个问题没去深究,简化处理。
application.yml Spring Boot配置文件不单是application.yml,但application.yml是配置的入口,也是主战场。resources文件夹下,差不多都是配置相关的文件。
端口和路径 application.yml 1 2 3 4 server: port: 8080 servlet: context-path: /single
用8080端口提供服务,应用的上下文路径(url的前缀)为single,所以请求Controller里的方法时,URL地址的前缀都是http://localhost:8080/single/。
Actuator application.yml 1 2 3 4 5 6 7 8 9 10 server.shutdown: graceful management: server: port: 7080 endpoints: web.exposure.include: ["info" ,"health" ,"metrics" ,"shutdown" ] enabled-by-default: true endpoint: shutdown.enabled: true
把Actuator的端口另外配置为7080,跟应用端口分开,这样就可以不对外开放,只限制在本机访问,提高安全性。shutdown: graceful结合shutdown.enabled: true来实现优雅下线,向 http://localhost:7080/actuator/shutdown 发送POST请求即可。
JPA application.yml 1 2 3 4 5 6 7 8 9 spring: jpa: hibernate: ddl-auto: update show-sql: false database: h2 open-in-view: false properties: jakarta.persistence.sharedCache.mode: UNSPECIFIED
database: h2,使用文件数据库h2。ddl-auto: update,Hibernate会根据项目里的实体,自动建表或者修改表结构。生产环境建议使用验证模式,ddl-auto: validate,进行表结构的核实验证,在不匹配的时候停止运行,而不是自动去修改调整。生产环境的升级,应该有专门的数据迁移转换方案。jakarta.persistence.sharedCache.mode: UNSPECIFIED,解决Hibernate的过时警告: Encountered deprecated setting [javax.persistence.sharedCache.mode], use [jakarta.persistence.sharedCache.mode] instead
数据库h2 为了把代码Clone下来之后快速运行这个Single项目,我们选择文件数据库H2,相关参数放在application-datasource.yml里,并在application.yml里通过 spring.profiles.include: datasource 把数据库的配置包含进来。
application-datasource.yml 1 2 3 4 spring: datasource: driver-class-name: org.h2.Driver url: jdbc:h2:file:D:\\temp\\local-db\\h2-single\\testdb
修改一下application-datasource.yml就可以跑起来了。
初始化数据 使用@PostConstruct 注解,在应用启动后进行数据库的初始化,向用户表(simple_user)和权限表(simple_authority)里添加了用户及权限:
账号
密码
角色
权限
admin
admin
ROLE_ADMIN
worker
worker
ROLE_WORKER
DIGGING
有ROLE_前缀的是角色,其他为权限。
SingleApplication.java 1 2 3 4 5 6 7 8 9 10 11 12 13 14 15 16 17 18 19 20 21 22 23 24 25 26 27 @PostConstruct public void initialize () { final long adminRoleId = 1L ; final long workerRoleId = 2L ; final long diggingAuthorityId = 200L ; if (!simpleAuthorityRepository.findById(adminRoleId).isPresent()) { simpleAuthorityRepository.save(new SimpleAuthority (adminRoleId, "ROLE_ADMIN" )); simpleAuthorityRepository.save(new SimpleAuthority (workerRoleId, "ROLE_WORKER" )); simpleAuthorityRepository.save(new SimpleAuthority (diggingAuthorityId, "DIGGING" )); } SimpleUser admin = simpleUserRepository.findByUsername("admin" ); if (admin == null ) { admin = new SimpleUser (adminRoleId, "admin" , passwordEncoder.encode("admin" )); admin.setAuthorities(simpleAuthorityRepository.findAllById(Arrays.asList(adminRoleId))); simpleUserRepository.save(admin); SimpleUser worker = new SimpleUser (workerRoleId, "worker" , passwordEncoder.encode("worker" )); worker.setAuthorities(simpleAuthorityRepository.findAllById(Arrays.asList(workerRoleId, diggingAuthorityId))); simpleUserRepository.save(worker); } }
用户和权限的关联是在SimpleUser里,用注解的方式配置了一个多对多的关系,存放在user_authority表里:
SimpleUser.java 1 2 3 4 5 6 7 8 9 10 @Entity @Table(name = "simple_user") public class SimpleUser implements UserDetails , Serializable { ... @ManyToMany(cascade = CascadeType.ALL, fetch = FetchType.EAGER) @JoinTable(name = "user_authority", joinColumns = @JoinColumn(name = "user_id", referencedColumnName = "id"), inverseJoinColumns = @JoinColumn(name = "authority_id", referencedColumnName = "id", table = "simple_authority")) private Collection<SimpleAuthority> authorities; ... }
Caffeine缓存 使用Spring Boot内置的缓存:Caffeine,配置用户信息的缓存名称为simple_user,加速Security在授权时对用户信息的访问(非常频繁):
application.yml 1 2 3 4 5 6 spring: cache: type: caffeine cache-names: simple_user caffeine: spec: maximumSize=2000,expireAfterAccess=10m,recordStats
application.yml是通用配置,个性化配置在CaffeineConfiguration里实现:
CaffeineConfiguration.java 1 2 caches.add(new CaffeineCache(...)); cacheManager.setCaches(caches);
RSA密钥 资源文件夹(resources)下的jwt_rsa.key和jwt_rsa.pub是用openssl生成的RSA密钥,用来做JWT的签名和验证,生成脚本如下:
使用openssl生成RSA密钥 1 2 3 4 5 6 7 8 $ openssl genrsa -out single_jwt_key.pem 2048 $ openssl pkcs8 -topk8 -inform PEM -outform DER -in single_jwt_key.pem -out jwt_rsa.key -nocrypt $ penssl rsa -in single_jwt_key.pem -pubout -outform DER -out jwt_rsa.pub
config Java包top.xiaoboey.practice.single.config里的类,主要是本项目的一些个性化配置。
Spring Security 增加Spring Security的依赖之后,Spring Boot就会自动配置并生效,拦截所有访问。这里把应用监控的/actuator和用户登录的/user路径下的访问都放开。
SecurityConfig.java 1 2 3 4 5 6 7 8 9 10 11 12 13 14 15 16 @Bean public SecurityFilterChain securityFilterChain (HttpSecurity http) throws Exception { ... http .csrf().disable() .formLogin().disable() .logout().disable() .authorizeHttpRequests() .requestMatchers(HttpMethod.OPTIONS).permitAll() .requestMatchers("/actuator/**" ).permitAll() .requestMatchers("/user/**" ).permitAll() .anyRequest().authenticated() ...; return http.build(); }
其他配置 缓存CaffeineConfiguration.java在前面已经讲过了,其他都是用户权限和访问日志的配置,另外开章节来详述。
Security和JWT 虽然Single项目我们的定位是单体应用,但是使用JWT(Json Web Token),结合Spring Security的认证和授权机制,可以让Single进行分布式部署,跑多个实例。
JWT的核心是认证方在核实用户身份后(本项目是用账号和密码),使用私钥签发一个包含用户信息的JSON令牌,然后在需要授权的地方用公钥验证令牌,获取用户信息并进行授权。
这里把本项目JWT和Spring Security进行用户认证授权的时序图画一下,方便后续代码的理解:
sequenceDiagram
participant R as Request
participant F as AuthAndLogFilter
participant S as Spring Security
participant C as Controller

Note right of R: Request Service that Permit All
R ->> F: POST without token: /user/login
activate F
F ->> F: No token, skip authentication
F ->> S: No AuthenticationToken
deactivate F
activate S
S ->> S: Authorization
deactivate S
S ->> C: Permit All Requests: /user/**
activate C
C ->> C: UserController.login()
deactivate C
C -->> R: token

Note right of R: Request Service that authentication required

R ->> F: POST with token: /business/someInfo
activate F
F ->> F: Verify token, complete authentication
deactivate F
F ->> S: With AuthenticationToken
activate S
S ->> S: Authorization
deactivate S
S ->> C: Allow access: /business/someInfo
activate C
C ->> C: BusinessController.someInfo()
deactivate C
C -->> R: Response of /business/someInfo
加载密钥 密钥的读取加载,以私钥为例:
JsonWebTokenConfig.java 1 2 3 4 5 6 7 8 9 10 @Bean public RSAPrivateKey jwtPrivateKey () throws IOException, NoSuchAlgorithmException, InvalidKeySpecException { ClassPathResource resource = new ClassPathResource ("jwt_rsa.key" ); byte [] keyBytes; try (InputStream inputStream = resource.getInputStream()) { keyBytes = inputStream.readAllBytes(); } PKCS8EncodedKeySpec spec = new PKCS8EncodedKeySpec (keyBytes); return (RSAPrivateKey) KeyFactory.getInstance("RSA" ).generatePrivate(spec); }
生成令牌 登录时验证用户名和密码之后,生成包含用户信息(主要是权限)的JWT:
SimpleUserService.java 1 2 3 4 5 6 7 8 String token = JWT.create() .withIssuer(issuer) .withSubject(user.getUsername()) .withJWTId(UUID.randomUUID().toString()) .withClaim(JsonWebTokenConfig.CLAIM_AUTHORITIES, authorityList) .withIssuedAt(Date.from(Instant.now())) .withExpiresAt(Date.from(expiresAt)) .sign(Algorithm.RSA256(null , rsaPrivateKey));
JWTId使用随机UUID来标记同一个账号的不同会话,Claim是用KeyValue的方式来包含自定义的数据,IssuedAt表示发布时间,ExpiresAt是过期时间,然后整个Json格式的Token用私钥签名。
验证和解码令牌 自定义过滤器从Header里获取令牌,验证其有效性,解码后生成UsernamePasswordAuthenticationToken供后续的授权用。
AuthAndLogFilter.java 1 2 3 4 5 6 7 8 9 10 11 12 13 14 15 16 17 18 19 20 21 private UsernamePasswordAuthenticationToken getAuthentication (HttpServletRequest request) { String authorizationHeader = request.getHeader(HttpHeaders.AUTHORIZATION); if (StringUtils.hasText(authorizationHeader) && authorizationHeader.startsWith("Bearer " )) { String token = authorizationHeader.substring(7 ); DecodedJWT jwt = jwtVerifier.verify(token); String jwtId = jwt.getClaim(JsonWebTokenConfig.CLAIM_JTI).asString(); String[] authorities = jwt.getClaim(JsonWebTokenConfig.CLAIM_AUTHORITIES).asArray(String.class); List<String> authorityList = new ArrayList <>(); authorityList.addAll(Arrays.asList(authorities)); String username = jwt.getSubject(); UsernamePasswordAuthenticationToken authentication = new UsernamePasswordAuthenticationToken ( username, jwtId, authorityList.stream().map(authority -> new SimpleGrantedAuthority (authority)).collect(Collectors.toList()) ); return authentication; } return null ; }
AuthAndLogFilter
这个过滤器是扩展的OncePerRequestFilter,就如OncePerRequestFilter名称的字面意思一样,这个过滤器在每个请求周期里都会执行一次。本项目利用它来完成JWT的处理和访问日志记录。
在Security的配置里,把自定义的AuthAndLogFilter过滤器设置为先于Security执行:
SecurityConfig.java 1 2 3 4 @Bean public SecurityFilterChain securityFilterChain (HttpSecurity http) throws Exception { http.addFilterBefore(authAndLogFilter, UsernamePasswordAuthenticationFilter.class); ...
在AuthAndLogFilter完成了令牌的验证和解码,并将认证信息放入Security Context,供后续的Security授权使用
AuthAndLogFilter.java 1 2 3 4 5 6 7 ... UsernamePasswordAuthenticationToken authentication = getAuthentication(request);if (authentication != null ) { SecurityContextHolder.getContext().setAuthentication(authentication); ... } ...
记录日志 应用的访问日志,有很多方式可以记录,像nginx这类网关类应用,在流量入口记录一些基本的access log,而Spring Boot的Actuator也提供了接口可以记录。本项目结合Filter和AOP(面向切面编程),自定义实现了访问日志的记录,主要是为了记录更详细的业务处理信息。
还是先上个图,看着有点复杂。主要是因为日志记录时有两个位置的异常处理,直接跳出了请求链路,一个是SecurityCofnig里的异常处理,另外一个是Controller的全局异常处理。
sequenceDiagram
participant R as Request
participant F as AuthAndLogFilter
participant S as Spring Security
participant C as Controller

R ->> F: Call Some API
activate F
F ->> F: Initialize SimpleLog and Cache
F ->> S: filterChain.doFilter()
deactivate F
S ->> S: Authorization is Success?
alt is Authorization Success:
S ->> C: Permit
C ->> C: Handle Request is OK?
  alt is Handle OK:
    C -->> F: ApiResult(OK)
    activate F
    F ->> F: Save SimpleLog to Database
    deactivate F
    F -->> R: ApiResult(OK)
  else is Handle FAIL:
    activate C
    C ->> C: GlobalExceptionController.exceptionHandler()
    C ->> C: Save SimpleLog to Database
    deactivate C
    C -->> R: ApiResult(FAIL)
  end
else is Authorization Exception:
  activate S
  S ->> S: Record Exception SimpleLog
  S ->> S: Save SimpleLog to Database
  deactivate S
  S -->> R: ApiResult with Exception Info
end
AuthAndLogFilter 在AuthAndLogFilter里,除了JWT令牌的验证和认证,也包含了访问日志的自定义处理。
基于OncePerRequestFilter的特性,以及AuthAndLogFilter先于Security执行,所以非常适合在这里进行访问日志的初始化。每个请求进来后,都默认记录了HttpServletRequest的id,uri和参数等,然后放入缓存,待后续处理完成后再计算执行时间,写入数据库。
SimpleLog.java 1 2 3 4 5 6 public SimpleLog (HttpServletRequest request) { this .setRequestId(request.getRequestId()); this .setUri(request.getRequestURI()); this .setAccessTime(Timestamp.from(Instant.now())); this .setDurationMs(0L ); }
SimpleLogService.java 1 2 3 4 5 6 7 8 9 10 11 12 @CacheEvict(key = "#simpleLog.getRequestId()") @Transactional(propagation = Propagation.REQUIRED, rollbackFor = Exception.class) public void saveThenClean (SimpleLog simpleLog) { Instant now = Instant.now(); Duration duration = Duration.between(simpleLog.getAccessTime().toInstant(), now); simpleLog.setDurationMs(duration.toMillis()); simpleLog.setLogTime(Timestamp.from(now)); SimpleLog target = new SimpleLog (); BeanUtils.copyProperties(simpleLog, target); simpleLogRepository.save(target); }
AOP记录业务日志 自定义注解OperationLog:
OperationLog.java 1 2 3 4 5 6 7 8 9 10 11 12 13 @Target(ElementType.METHOD) @Retention(RetentionPolicy.RUNTIME) @Documented public @interface OperationLog { @AliasFor("operation") String value () default "" ; @AliasFor("value") String operation () default "" ; boolean ignoreParams () default false ; boolean ignoreResult () default true ; }
利用AOP面向切面编程机制,收集方法执行的相关信息并进行记录:
OperationLogAspect.java 1 2 3 4 5 6 7 8 9 10 11 12 13 14 15 16 17 18 19 20 21 22 23 24 25 26 27 28 29 30 @Aspect @Component public class OperationLogAspect { ... @Before(value = "operateLogPointCut()") public void handleBefore (JoinPoint joinPoint) { MethodSignature methodSignature = (MethodSignature) joinPoint.getSignature(); Method method = methodSignature.getMethod(); OperationLog operationLog = method.getAnnotation(OperationLog.class); if (operationLog != null ) { HttpServletRequest request = ((ServletRequestAttributes) (RequestContextHolder.currentRequestAttributes())).getRequest(); String requestId = request.getRequestId(); SimpleLog dto = simpleLogService.getFromCache(requestId); String operation = operationLog.operation(); if (StringUtils.hasText(operation)) { dto.setOperation(operation); } if (operationLog.ignoreParams()) { dto.setQueryParams(null ); } dto.setStatusCode(HttpServletResponse.SC_OK); simpleLogService.saveToCache(dto); } } ... }
可以拿到返回数据ApiResult进行记录:
OperationLogAspect.java 1 2 3 4 5 6 ... @AfterReturning(value = "operateLogPointCut()", returning = "jsonResult") public void handleReturning (JoinPoint joinPoint, ApiResult jsonResult) { ... } ...
如果返回结果不是ApiResult类型,则不能使用@OperationLog来记录日志。ignoreResult=true 时会导致异常。
WEB测试 Single项目用MockMvc进行了Controller的测试,确保代码调整后可以快速验证:
用户登录及拼凑Bearer令牌:
SingleApplicationTests.java 1 2 3 4 5 6 7 8 9 10 11 12 13 14 15 16 17 18 19 20 21 22 23 24 25 26 27 @SpringBootTest @AutoConfigureMockMvc class SingleApplicationTests { ... String acquireBearerToken (MockMvc mvc, String name, String pwd) throws Exception { ObjectMapper objectMapper = new ObjectMapper (); HashMap<String, Object> map = new HashMap <>(1 ); mvc.perform(MockMvcRequestBuilders.post("/user/login" ) .contentType(MediaType.APPLICATION_JSON) .param("name" , name) .param("pwd" , pwd)) .andExpect(status().isOk()) .andExpect(result -> { String content = result.getResponse().getContentAsString(); ApiResult<String> apiResult = objectMapper.readValue(content, new TypeReference <>() { }); if (apiResult.getCode() == HttpServletResponse.SC_OK) { map.put("token" , apiResult.getContent()); } }); String token = (String) map.getOrDefault("token" , null ); assertThat(token).isNotEmpty(); return "Bearer " + token; } ... }
使用Bearer令牌测试Controller:
SingleApplicationTests.java 1 2 3 4 5 6 7 8 String adminToken = acquireBearerToken(mvc, "admin" , "admin" );String urlTemplate = "/business/someInfo" ;mvc.perform(MockMvcRequestBuilders.get(urlTemplate) .contentType(MediaType.APPLICATION_JSON) .header(HttpHeaders.AUTHORIZATION, adminToken)) .andExpect(status().isOk()) .andExpect(content().json("{\"code\":200,\"content\":\"Some Info Found null!\"}" ));
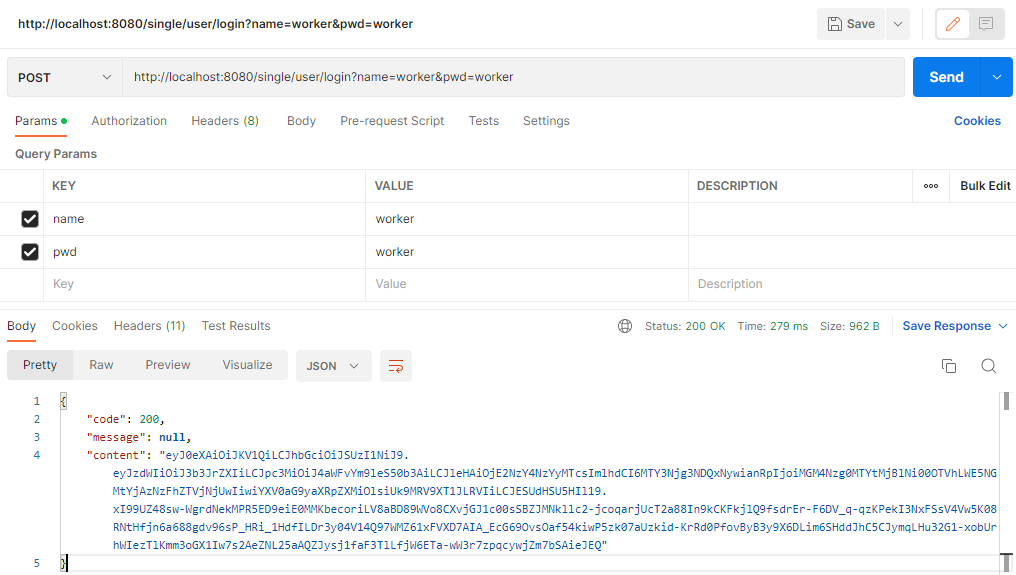
另外也可以用Postman来测试:
扩展点(优化完善) 用户认证安全性差 Single项目的用户认证代码非常简单,即直接验证密码是否正确,没有记录用户的重试次数和截断,所以很容易被暴力破解。另外也没有第三方认证,比如短信验证码、图形验证码等,所以安全性很差。
如果应用部署在公网上,建议加上短信验证码,或者微信登录这类第三方认证。
减少JWT令牌大小 授权这里是JWT方案,所以为了减少令牌在网络上传输消耗的带宽和流量,应该尽量控制JWT令牌里包含的信息,建议是只包含角色信息。
如果是有非常多的Authority,即使用@PreAuthorize("hasAuthority('DIGGING')")这种方式鉴权,在业务复杂的时候,会导致令牌非常大。可以考虑JWT令牌里只包含用户ID,权限信息在验证JWT之后,再去数据库里查询获取,毕竟是单体应用嘛,再加上缓存机制,算是一个不错的方案。
自定义ApiResult的返回码 Single项目只是利用了HttpStatus(枚举)或者HttpServletResponse(常量)里定义的值,可以参考这两个类,定义自己的业务代码。